Getting Started with Vue 3, Vue Leaflet, and Stadia Maps
Free
Starter
Standard
Professional
Every web app benefits from a little geospatial intelligence. If you found this tutorial, you probably already know this. You can use Stadia Maps with Leaflet and Vue to add just the pop your dashboard or user experience needs—with an interactive map.
This tutorial will show you how to build a simple map integration for your Vue 3 app using Leaflet and Stadia Maps. After you're done with this tutorial, you'll be able to:
- Create a map in Vue 3
- Add layers to the map
- Visualize a simple data set with markers on the map
If all goes well, you'll get something that looks like this:
For local development on a web server at localhost or 127.0.0.1,
you can get started without any API keys or domain setup!
For mobile, backend, and non-local web development, you'll need either domain auth or an API key. If you don't already have a Stadia Maps account, sign up for a free to get started.
Domain-based authentication
Domain-based authentication is the easiest form of authentication for production web apps. No additional application code is required, and you don't need to worry about anyone scraping your API keys. We recommend this for most browser-based applications.
- Sign in to the client dashboard.
- Click "Manage Properties."
- Under "Authentication Configuration," click the button to add your domain.
API key authentication
Authenticating requests via API key
You can authenticate your requests by adding an API key to the query string or HTTP header.
https://api.stadiamaps.com/tz/lookup/v1?lat=59.43696&lng=24.75357&api_key=YOUR-API-KEY
Authorization: Stadia-Auth YOUR-API-KEY
The simplest is to add a query string parameter api_key=YOUR-API-KEY to your request URL.
For example, to access the /tz/lookup API endpoint, your request URL might look like this.
You can also use an Authorization HTTP header instead of a query string
as shown below.
Don't forget the Stadia-Auth prefix!
How to get an API key
Don't have an API key yet? Follow these easy steps!
- Sign in to the client dashboard. (If you don't have an account yet, sign up for free; no credit card required!)
- Click "Manage Properties."
- If you have more than one property (ex: for several websites or apps), make sure you have selected the correct property from the dropdown at the top of the page.
- Under "Authentication Configuration," you can generate, view or revoke your API key.
Video: How to generate your API key
Demo Code
You can clone the full code for this tutorial from GitHub and follow along to save typing.
Create a Vue 3 App
If you don't already have a Vue app, it's easy to create one.
Run the following command and follow the prompts:
npm init vue@latest
cd <project-name>
npm install
Fix Vue 3 & Leaflet Attribution Display
The default Vue 3 app ships with styles that aren't compatible with Leaflet, mostly affecting how the attribution and other controls are displayed. You'll want to remove those before you proceed.
The simplest way to do this is to remove this CSS import in src/main.js:
- import './assets/main.css'
Add the styles back
Later, you'll probably want to go back and re-enable main.css. When you do that, be sure to remove the
display: grid from #app to prevent conflicts with Leaflet.
Install Dependencies
You'll be using Leaflet and Vue Leaflet, a Leaflet-wrapper for Vue for the map integration.
Assuming you're in the project directory, run the following:
npm install --save leaflet @vue-leaflet/vue-leaflet
Start the Local Server
You can use the localhost development web server (via npm dev) to get
started developing your own app and following this tutorial right away. No
account required!
npm dev
Download Data
To give you a taste of the power of Leaflet and Vue, you'll need some data to download! We've already created a JSON file of all the arcades in Japan, which you can download and freely use in your project.
Create Map Page
Before you can create the map, you'll need to add and remove some basic boilerplate in your new Vue app.
First, remove the <header> and <TheWelcome> components from the src/App.vue file. (You should have an empty page now.)
Next, update the following the <script setup> to look like this:
<script setup>
import "leaflet/dist/leaflet.css"
import { LMap, LTileLayer } from "@vue-leaflet/vue-leaflet"

import arcades from "./arcades.json"

let zoom = ref(6)
let center = ref([38, 139.69])
</script>
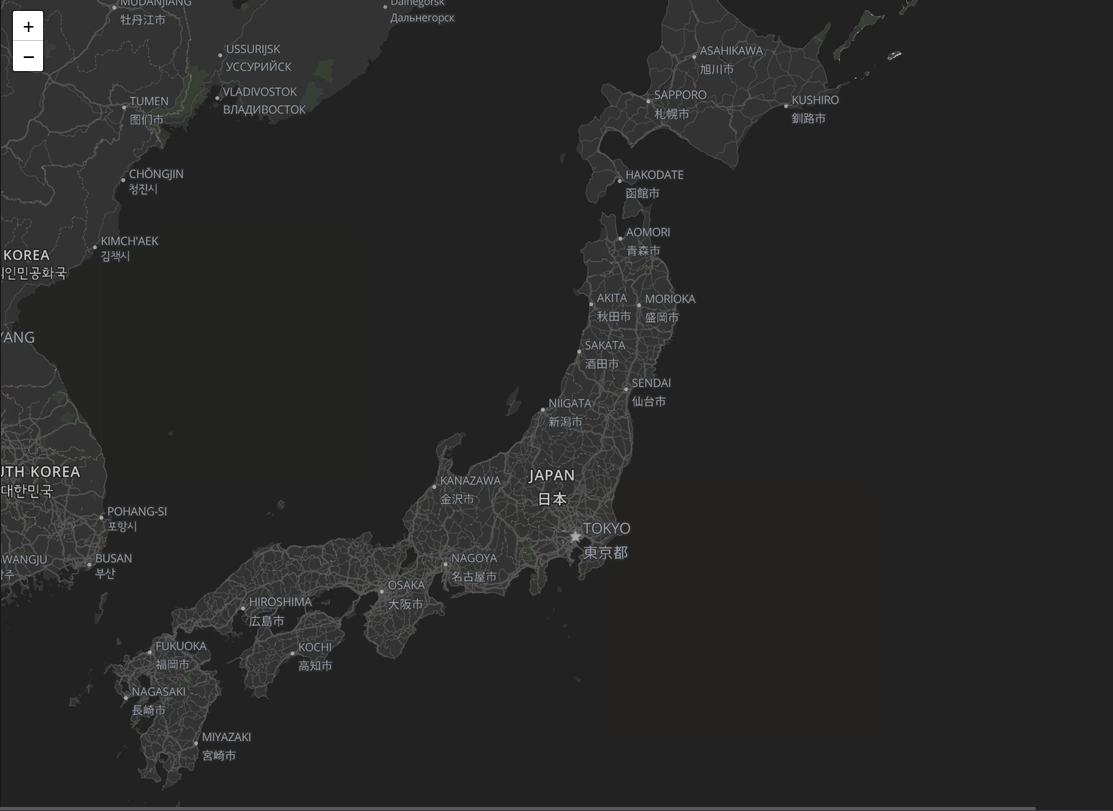
Add the Map
Now you're ready to add your map to the page. In Vue Leaflet, you do this with the <l-map> component. The primary map
component takes a few parameters (you'll set zoom and center which controls what part of the world the map starts
at). Once you have a map, you'll need a base layer, which you'll add with the <l-tile-layer> component.
Tip
Check out the library for more raster map styles.
You can add both by updating the template with the following code. Your
entire <template> should look something like this:
<template>
  <main>
    <l-map ref="map" v-model:zoom="zoom" v-model:center="center" :useGlobalLeaflet="false">
      <l-tile-layer url="https://tiles.stadiamaps.com/tiles/alidade_smooth_dark/{z}/{x}/{y}{r}.png"
                    layer-type="base"
                    name="Stadia Maps Basemap"></l-tile-layer>
    </l-map>
  </main>
</template>
Reactive zoom and center
Did you notice how the zoom and center were defined in the setup script? This means they act like normal Vue reactive variables, allowing you to update them dynamically and receive updates from the map as it is scrolled.
Add the following inside the <style> section of the component:
html, body {
  margin: 0;
  padding: 0;
}

main {
  height: 100vh;
  width: 100vw;
}
Your map should now look something like this:
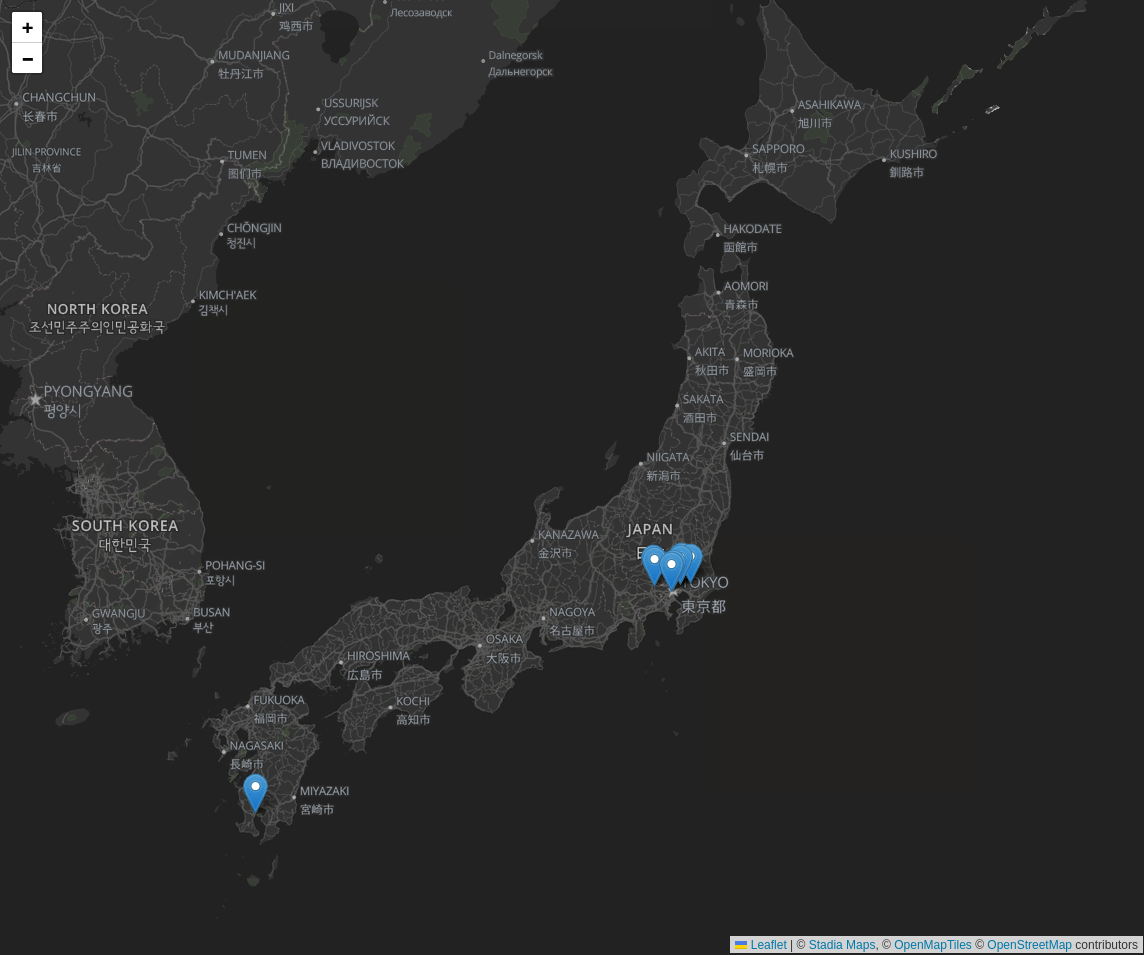
Add the Markers
Once you have a map, it's time to add some markers! To add the markers, you'll want to use an l-marker component and
then repeat it for each marker. Inside the <l-map> element, add the following:
<l-marker v-for="arcade in arcades.features" :lat-lng="arcade.geometry.coordinates.reverse()"></l-marker>
Since that's a lot of markers, go ahead and reduce the number of pins for this tutorial.
<l-marker v-for="arcade in arcades.features.slice(0,10)" :lat-lng="arcade.geometry.coordinates.reverse()"></l-marker>
Your map should now look something like this:
Well done! You just created your first Vue and Leaflet map.  That's it for this tutorial.
Next Steps
Leaflet and Vue have a lot of other functionality not covered is this tutorial. Stay tuned for future tutorials that will show you how to reduce the clutter of a many markers on the map and display other kinds of data on the map!
Once your amazing app is ready to move beyond localhost, sign up for a free
Stadia Maps account, and we'll walk through the next steps.