Authentication
This page covers everything you need to know to access map tiles and APIs from Stadia Maps.
Choosing the right authentication method
| Use case | Recommended method |
|---|---|
Local development (localhost) |
No authentication needed |
| Production websites | Domain-based authentication |
| Mobile apps (iOS, Android) | API key |
| Server-side applications | API key |
| Desktop applications | API key |
| Intranet websites | API key |
For production websites, domain-based authentication is the most secure option. It requires no code changes and prevents API key exposure. For everything else, use an API key and follow our security best practices.
Local development
We've tried to make things as easy as possible for local web development.
As long as you're running via a development server accessed via localhost or 127.0.0.1,
you don't need an API key!
So your React, Vue, and even local WordPress installations will "just work" out of the box.
Local development rate limits
Requests made this way are subject to strict rate limits. If you start receiving HTTP 429 responses regularly, sign up for an account (it's free!) and create an API key.
Domain-based authentication
Domain-based authentication is the easiest form of authentication for production web apps. No additional application code is required, and you don't need to worry about anyone scraping your API keys. We recommend this for most browser-based applications.
- Sign in to the client dashboard.
- Click "Manage Properties."
- Under "Authentication Configuration," click the button to add your domain.
Domain-based authentication works by validating the Origin and Referer headers that browsers automatically send with every request.
These headers are set by the browser itself,
not by JavaScript or your application code,
making this method both secure and convenient for web applications.
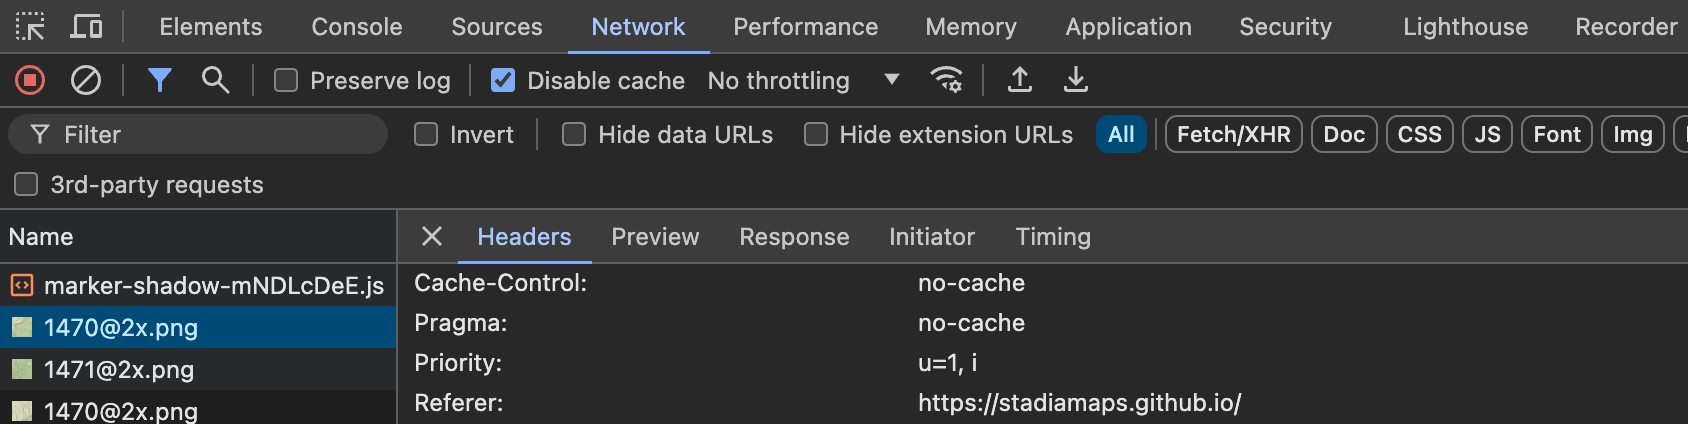
Getting a 401 Unauthorized response or seeing a Stamen warning tile?
Domain authentication usually "just works" but sometimes it doesn't. These are a few common issues related to domain authentication.
Referrer-Policyis set tono-referrer. Some platforms, such as Azure Static Web Apps, do this by default. Relaxing this header to something likestrict-origin-when-cross-origin(if your site uses HTTPS;origin-when-cross-originif using HTTP) will let us authenticate your requests while preserving privacy.- Are you using a hosting service like Vercel, Netlify, or GitHub pages with a custom domain?
In many configurations, the headers will indicate that the request is coming from a subdomain on your host
rather than your custom domain.
Check the
OriginandRefererheaders in your browser's web inspector/dev tools to verify.
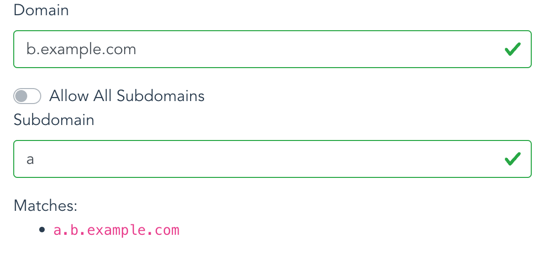
- Is your page hosted on a subdomain?
It's easy to forget to include the subdomain or (if appropriate) allow all subdomains.
If your site is hosted on
a.b.example.com, you need to set the subdomain toaand the domain tob.example.comas shown in the screenshot below:
API keys
To access maps and APIs outside a web browser, including server-side code and mobile apps, you need an API key.
Generating and revoking API keys
You can manage your API keys in the client dashboard.
- Sign in to the client dashboard. (If you don't have an account yet, sign up for free; no credit card required!)
- Click "Manage Properties."
- If you have more than one property (ex: for several websites or apps), make sure you have selected the correct property from the dropdown at the top of the page.
- Under "Authentication Configuration," you can generate, view or revoke your API key.
Video: How to generate your API key
Using your API key
You can authenticate your requests by adding an API key to the query string or HTTP header.
The simplest is to add a query string parameter api_key=YOUR-API-KEY to your request URL.
For example, to access the /tz/lookup API endpoint, your request URL might look like this.
https://api.stadiamaps.com/tz/lookup/v1?lat=59.43696&lng=24.75357&api_key=YOUR-API-KEY
You can also use an Authorization HTTP header instead of a query string
as shown below.
Don't forget the Stadia-Auth prefix!
Authorization: Stadia-Auth YOUR-API-KEY
Vector stylesheets
If you're accessing vector tiles via API key (ex: in a mobile app) and you're using one of our styles, add an API key query parameter to the stylesheet URL. We'll rewrite the stylesheet so that all data sources requiring authentication use your key. This is the easiest way to get access to vector tiles in a mobile app or intranet website.
If you're using your own style with our data, see our custom style guide for tips on authenticating our data sources.
Protecting your API keys
You should take care not to expose your API key unnecessarily. That's why we recommend domain-based authentication for web browser applications. We recommend only using API keys in cases where it is not likely to be leaked to an end user (ex: server-side and mobile applications).
If you are developing locally and exceed the rate limit for keyless access, be careful not to accidentally commit your API key to your repository.
Securing your API keys in apps
Securing your API keys requires special care whenever an application is available to end users outside your organization. This is always tricky and tends to be a bit different for every app, but we can offer some general best practices:
- Avoid shipping API keys in an app binary when possible. For example, on iOS you can take advantage of on-demand resources to separate this from the IPA download.
- Ensure that any long-term storage of API keys uses the platform's hardware-secured APIs (ex: Keychain or Android Keystore).
- Rotate your API keys periodically. You can do this manually in the dashboard, or programmatically via our Account Management API if you have access.
- Monitor your usage in the client dashboard and investigate any unexpected spikes.
For more detailed guidance, see our Securing Your Integration guide.
Next steps
- Securing Your Integration — Best practices for mobile apps, server-side applications, and understanding our security model
- Service Limits — Rate limits and usage tiers
- Account Management API — Programmatic management of properties, domains, and API keys