Isochrones (Reachable Range)
Free
Starter
Standard
Professional
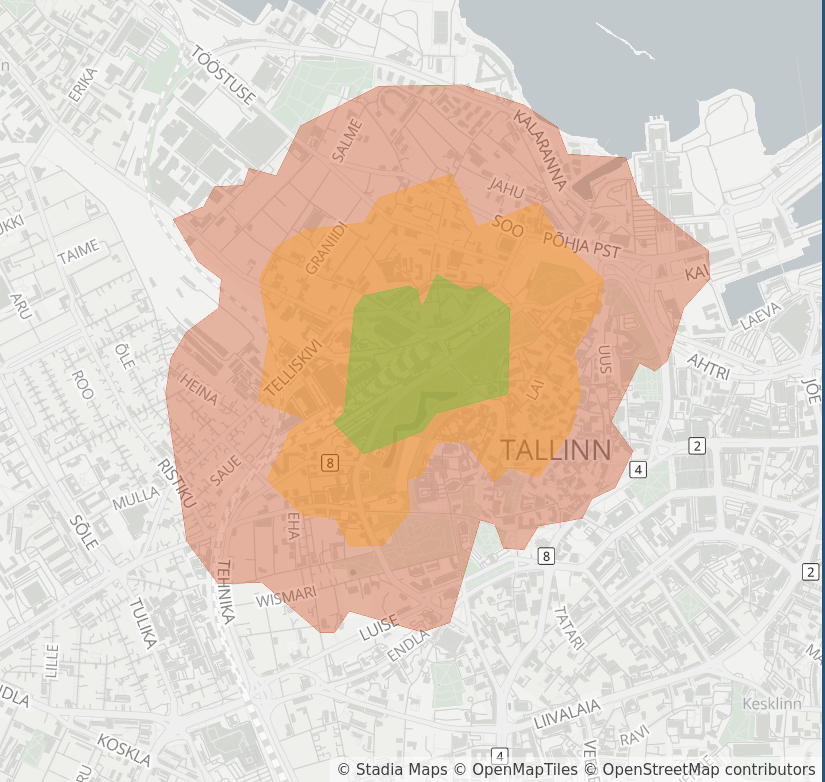
Isochrones describe the area you can reach from a starting point, taking into account mode of travel and a constraint on either time or distance. This lets you quickly get an idea of mobility in an area, find out what is reachable within a given routing distance (ex: to look for nearby gas or changing), and inform planning.
Endpoint: https://api.stadiamaps.com/isochrone/v1
Example Code
Installation Instructions
The Stadia Maps JavaScript/TypeScript SDK is available for any package manager that supports the npm registry.
)
npm install @stadiamaps/api
yarn add @stadiamaps/api
bun add @stadiamaps/api
import { RoutingApi, Configuration, IsochroneRequest } from '@stadiamaps/api';

// If you are writing for a backend application or can't use domain-based auth,
// then you'll need to add your API key like so:
//
// const config = new Configuration({ apiKey: "YOUR-API-KEY" }); (1)
// You can also use our EU endpoint to keep traffic within the EU using the basePath option:
// const config = new Configuration({ basePath: "https://api-eu.stadiamaps.com" });
// const api = new RoutingApi(config);
const api = new RoutingApi();

const req: IsochroneRequest = {
    id: "isochrone",
    locations: [
        {
            lat: 59.436884,
            lon: 24.742595
        }
    ],
    costing: "pedestrian",
    contours: [
        {
            time: 5,
            color: "aabbcc"
        }
    ],
    polygons: true
};
const res = await api.isochrone({ isochroneRequest: req });
- Learn how to get an API key in our authentication guide.
Installation Instructions
The Stadia Maps Python SDK is available through any package manager that supports PyPi.
)
pip install stadiamaps
uv add stadiamaps
poetry add stadiamaps
import os
import stadiamaps
from stadiamaps.rest import ApiException

# You can also use our EU endpoint to keep traffic within the EU like so:
# configuration = stadiamaps.Configuration(host="https://api-eu.stadiamaps.com")
configuration = stadiamaps.Configuration()

# Configure API key authentication (ex: via environment variable). (1)
configuration.api_key['ApiKeyAuth'] = os.environ["API_KEY"]

with stadiamaps.ApiClient(configuration) as api_client:
    # Create an instance of the API class
    api_instance = stadiamaps.RoutingApi(api_client)

    try:
        req = stadiamaps.IsochroneRequest(
            id="isochrone",
            locations=[{"lat": 40.042072, "lon": -76.306572}],
            costing=stadiamaps.IsochroneCostingModel.PEDESTRIAN,
            contours=[
                stadiamaps.Contour(time=5, color="aabbcc")
            ],
            polygons=True,
        )

        res = api_instance.isochrone(req)
    except ApiException as e:
        # Add your error handling here
        print("Exception when calling the Stadia Maps API: %s\n" % e)
- Learn how to get an API key in our authentication guide.
Installation Instructions
If aren't already using Maven Central, add the repository in your Gradle build script.
repositories {
    mavenCentral()
}
Then, add the API package and its dependencies.
dependencies {
    val retrofitVersion = "2.12.0"

    // API package
    implementation("com.stadiamaps:api:7.1.0")

    // Dependencies
    implementation("com.squareup.moshi:moshi-kotlin:1.15.2")
    implementation("com.squareup.moshi:moshi-adapters:1.15.2")
    implementation("com.squareup.okhttp3:logging-interceptor:4.12.0")
    implementation("com.squareup.retrofit2:retrofit:$retrofitVersion")
    implementation("com.squareup.retrofit2:converter-moshi:$retrofitVersion")
    implementation("com.squareup.retrofit2:converter-scalars:$retrofitVersion")
}
dependencies {
    def retrofitVersion = "2.12.0"

    // API package
    implementation 'com.stadiamaps:api:7.1.0'

    // Dependencies
    implementation 'com.squareup.moshi:moshi-kotlin:1.15.2'
    implementation 'com.squareup.moshi:moshi-adapters:1.15.2'
    implementation 'com.squareup.okhttp3:logging-interceptor:4.12.0'
    implementation "com.squareup.retrofit2:retrofit:${retrofitVersion}"
    implementation "com.squareup.retrofit2:converter-moshi:${retrofitVersion}"
    implementation "com.squareup.retrofit2:converter-scalars:${retrofitVersion}"
}
Our API package is available on Maven Central.
All you need to do is add a few dependencies to your pom.xml.
<properties>
    <retrofit.version>2.12.0</retrofit.version>
</properties>

<dependencies>
    <!-- API package -->
    <dependency>
        <groupId>com.stadiamaps</groupId>
        <artifactId>api</artifactId>
        <version>7.1.0</version>
    </dependency>

    <!-- Dependencies -->
    <dependency>
        <groupId>com.squareup.moshi</groupId>
        <artifactId>moshi-kotlin</artifactId>
        <version>1.15.2</version>
    </dependency>
    <dependency>
        <groupId>com.squareup.moshi</groupId>
        <artifactId>moshi-adapters</artifactId>
        <version>1.15.2</version>
    </dependency>
    <dependency>
        <groupId>com.squareup.okhttp3</groupId>
        <artifactId>logging-interceptor</artifactId>
        <version>4.12.0</version>
    </dependency>
    <dependency>
        <groupId>com.squareup.retrofit2</groupId>
        <artifactId>retrofit</artifactId>
        <version>${retrofit.version}</version>
    </dependency>
    <dependency>
        <groupId>com.squareup.retrofit2</groupId>
        <artifactId>converter-moshi</artifactId>
        <version>${retrofit.version}</version>
    </dependency>
    <dependency>
        <groupId>com.squareup.retrofit2</groupId>
        <artifactId>converter-scalars</artifactId>
        <version>${retrofit.version}</version>
    </dependency>
</dependencies>
// Imports (at the top of your source file; we've used some wildcard imports for simplicity)
import com.stadiamaps.api.*
import com.stadiamaps.api.auth.ApiKeyAuth
import com.stadiamaps.api.infrastructure.*
import com.stadiamaps.api.models.*

// Set your API key (from an environment variable in this case) (1)
val apiKey = System.getenv("STADIA_API_KEY") ?: throw RuntimeException("API Key not set")

// Defining the host is optional and defaults to https://api.stadiamaps.com
// You can also use our EU endpoint to keep traffic within the EU like so:
// val client = ApiClient(baseUrl = "https://api-eu.stadiamaps.com")
val client = ApiClient()
client.addAuthorization("ApiKeyAuth", ApiKeyAuth("query", "api_key", apiKey))

// Configure a service for the group of APIs we want to talk to
val service = client.createService(RoutingApi::class.java)

// Set up the request.
// Note: this code is blocking for demonstration purposes.
// If you're using Kotlin with coroutines,
// you can also use these asynchronously within suspend functions.
// Synchronous code can enqueue a callback to avoid blocking
// (you'll definitely want to do one of these instead when on the main thread of an app).
// See the docs for details: https://square.github.io/retrofit/2.x/retrofit/retrofit2/Call.html
val req = IsochroneRequest(
    id = "isochrone",
    locations = listOf(Coordinate(40.042072, -76.306572)),
    costing = IsochroneCostingModel.pedestrian,
    contours = listOf(Contour(time = 5.0, color = "aabbcc")),
    polygons = true,
)
val res = service.isochrone(req).execute()

if (res.isSuccessful) {
    println("Found result: ${res.body()}")
} else {
    println("Request failed with error code ${res.code()}")
}
- Learn how to get an API key in our authentication guide.
Installation Instructions
Our Swift SDK is distributed using the Swift Package Manager (SPM).
Apple's documentation
shows how to add a Swift Package dependency to your Xcode project.
On the Add Package screen, you can find our package by its repository URL: https://github.com/stadiamaps/stadiamaps-api-swift.
import StadiaMaps

// This setup code can go anywhere before you actually make an API call (typically in your app init)
func setupStadiaMapsAPI() {
    // Set your API key (1)
    StadiaMapsAPI.customHeaders = ["Authorization": "Stadia-Auth YOUR-API-KEY"]
    // Optionally use our EU endpoint to keep traffic within the EU
    // StadiaMapsAPI.basePath = "https://api-eu.stadiamaps.com"
}

// This function demonstrates how to call the Stadia Maps API.
// If you have not yet adopted async/await in your Swift codebase, you can use the Task API
// to call async functions in a non-async context: https://developer.apple.com/documentation/swift/task.
func myFunction() async throws {
    let req = IsochroneRequest(
        id: "isochrone",
        locations: [Coordinate(lat: 40.042072, lon: -76.306572)],
        costing: .pedestrian,
        contours: [Contour(time: 5, color: "aabbcc")],
        polygons: true
    )
    let res = try await RoutingAPI.isochrone(isochroneRequest: req)

    // Do something with the response...
    print(res)
}
- Learn how to get an API key in our authentication guide.
Installation Instructions
Composer
To install the package via Composer,
add stadiamaps/api to your composer.json:
{
  "require": {
    "stadiamaps/api": "5.*"
  }
}
Then run composer install.
Manual Installation
You can also download the files manually and include autoload.php in your scripts:
<?php
require_once('/path/to/OpenAPIClient-php/vendor/autoload.php');
<?php
// use or require, depending on your installation method.

// Configure API key authorization (replace with your Stadia Maps API key) (1)
$config = OpenAPI\Client\Configuration::getDefaultConfiguration()->setApiKey('api_key', 'YOUR-API-KEY');
// You can also use our EU endpoint to keep traffic within the EU using setHost:
// $config = Configuration::getDefaultConfiguration()->setApiKey('api_key', 'YOUR-API-KEY')->setHost('https://api-eu.stadiamaps.com');

$apiInstance = new OpenAPI\Client\Api\RoutingApi(
    new GuzzleHttp\Client(),
    $config
);

try {
    $req = (new IsochroneRequest())
        ->setId('kesklinn')
        ->setLocations([(new Coordinate())->setLat(59.436884)->setLon(24.742595)])
        ->setCosting(CostingModel::PEDESTRIAN)
        ->setContours([(new Contour())->setTime(5)->setColor('aabbcc')])
        ->setPolygons(true);
    $result = $apiInstance->isochrone($req);
} catch (Exception $e) {
    // Add your error handling here
    echo 'Exception when calling the Stadia Maps API: ', $e->getMessage(), PHP_EOL;
}
- Learn how to get an API key in our authentication guide.
curl -X POST -H "Content-Type: application/json" -d '{
    "id": "isochrone",
    "locations": [
        {
            "lat": 59.436884,
            "lon": 24.742595
        }
    ],
    "costing": "pedestrian",
    "contours": [
        {
            "time": 5,
            "color": "aabbcc"
        }
    ],
    "polygons": true
}' "https://api.stadiamaps.com/isochrone/v1?api_key=YOUR-API-KEY"
Example Response
A successful response will be a GeoJSON
FeatureCollection object,
which can be rendered on a map (libraries like Leaflet and MapLibre can easily render a GeoJSON layer)
or processed with your favorite software or libraries.
The collection will include one feature per contour requested.
{
  "id": "isochrone",
  "features": [
    {
      "properties": {
        "fill-opacity": 0.33,
        "fillColor": "#aabbcc",
        "opacity": 0.33,
        "fill": "#aabbcc",
        "fillOpacity": 0.33,
        "color": "#aabbcc",
        "contour": 5,
        "metric": "time"
      },
      "geometry": {
        "coordinates": [
          [
            [
              24.745595,
              59.440481
            ],
            [
              24.741595,
              59.440749
            ],
            [
              24.73894,
              59.439539
            ],
            [
              24.739279,
              59.438568
            ],
            [
              24.741941,
              59.43823
            ],
            [
              24.740529,
              59.435818
            ],
            [
              24.741595,
              59.435157
            ],
            [
              24.742786,
              59.435075
            ],
            [
              24.743595,
              59.43426
            ],
            [
              24.744205,
              59.435274
            ],
            [
              24.744982,
              59.435271
            ],
            [
              24.745595,
              59.43477
            ],
            [
              24.746514,
              59.434884
            ],
            [
              24.750144,
              59.436884
            ],
            [
              24.748701,
              59.43799
            ],
            [
              24.748746,
              59.438884
            ],
            [
              24.746411,
              59.4397
            ],
            [
              24.745595,
              59.440481
            ]
          ]
        ],
        "type": "Polygon"
      },
      "type": "Feature"
    }
  ],
  "type": "FeatureCollection"
}
Traffic-Influenced Profiles
Traffic-influenced routing profiles incorporate current live conditions and historical data
to provide better ETAs and routes.
Traffic-influenced variants are available for auto, bus, taxi, and truck
using the _traffic and _traffic_premium suffixes (e.g., auto_traffic, and truck_traffic_premium).
Traffic Profile Access
Traffic-influenced routing requires a Standard plan or higher. See our pricing page for plan details and the API credit schedule.
| Suffix | Traffic Data |
|---|---|
_traffic |
Adaptive, heuristically-selected sources balancing accuracy and credit cost |
_traffic_premium |
Combines current conditions and predictive data for maximum accuracy |
Isochrones with a traffic-influenced profile and an explicit date_time will reflect the most realistic travel times.
For example, a rush-hour isochrone will typically be smaller than one in the middle of the night.
Complementary APIs
If you're working with addresses or venue names, you can look up their coordinates using our forward geocoding or structured geocoding APIs.