MCP Server
Enable LLMs to get information about the world with the Stadia Maps MCP server. Reduce hallucinations about location, access local time information anywhere on earth, generate route maps, and more!
Here are just a few of the ways you can prompt an LLM to make use of the tools in our MCP server:
- "What time is it in Tokyo?"
- "Make me a map showing the walking route from Depoo Turg to the Põhjala Tap Room."
- "Is the Põhjala Tap Room open right now? Use Stadia Maps to get this information."
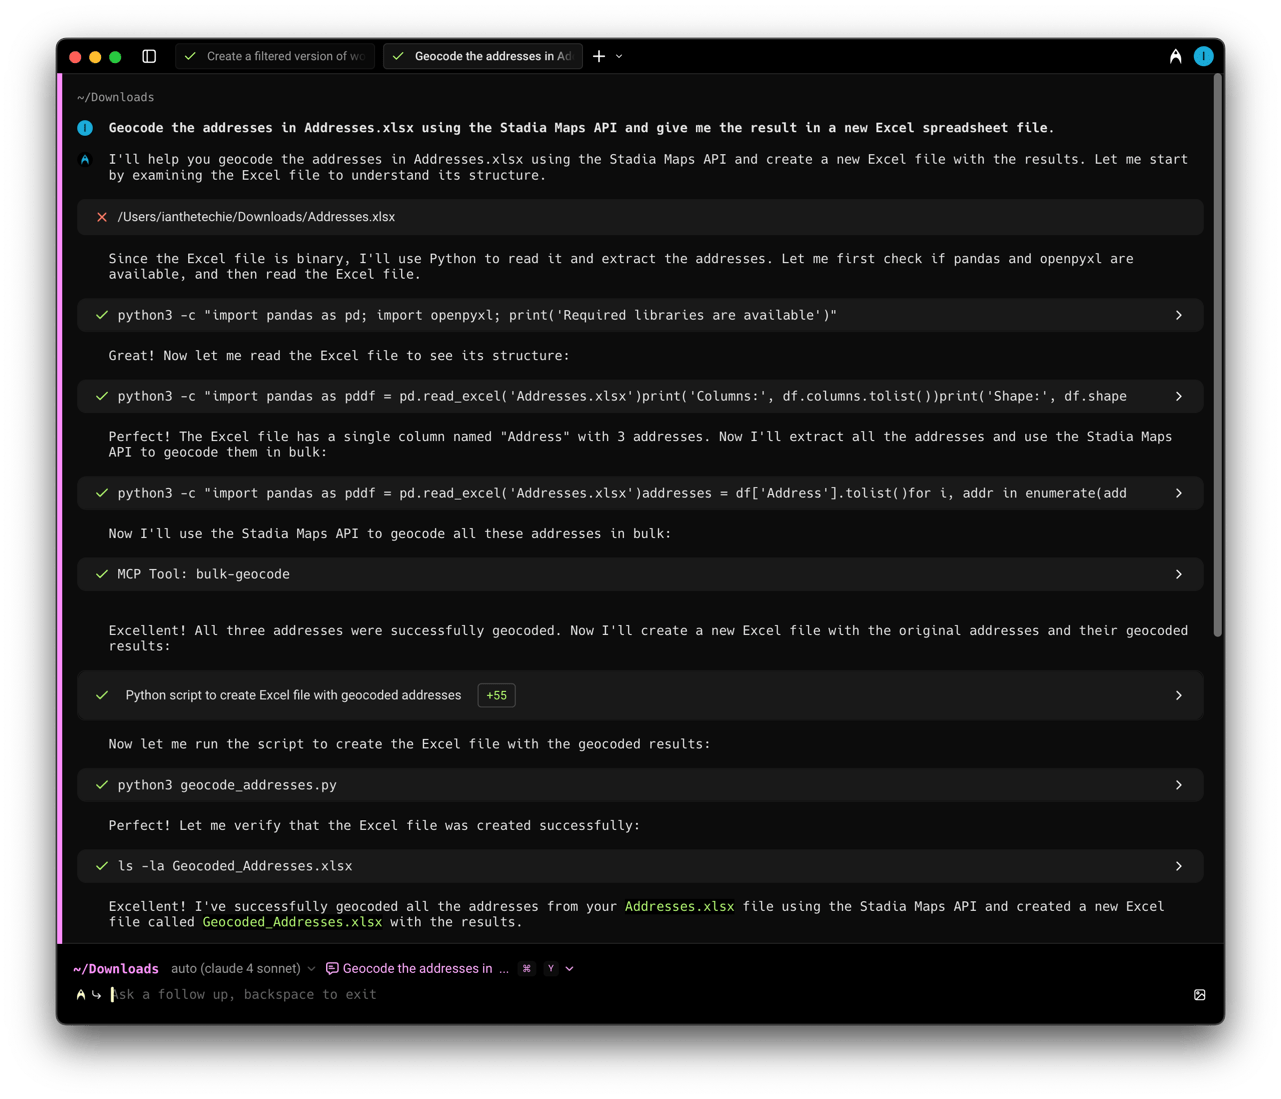
- "Geocode the addresses in the attached spreadsheet."
What is MCP?
The Model Context Protocol (MCP) is an open standard that enables connections between AI assistants and external data sources or tools. MCP servers provide specific capabilities to LLMs without requiring direct access to your systems.
Quickstart
The MCP server runs locally on your computer or server. We'll show you how to configure it for use with Claude Desktop and Warp, as well as write some code to interact with it directly using the Anthropic SDK from TypeScript.
MCPs are not limited to Claude!
We'll use Claude Desktop and the Anthropic API as a convenient example, but MCP is an open standard that you can use with other vendors, or even a local model, if it supports MCP.
Installation
We'll use bun for all of our examples, but you can use npm too.
# Clone the repository
git clone https://github.com/stadiamaps/stadiamaps-mcp-server-ts.git

# Navigate to the project directory
cd stadiamaps-mcp-server-ts

# Install dependencies
bun install

# Build with bun; check the `build` directory for the output
bun run build
Getting an API key
The MCP server requires a Stadia Maps API key.
- Sign in to the client dashboard. (If you don't have an account yet, sign up for free; no credit card required!)
- Click "Manage Properties."
- If you have more than one property (ex: for several websites or apps), make sure you have selected the correct property from the dropdown at the top of the page.
- Under "Authentication Configuration," you can generate, view or revoke your API key.
Video: How to generate your API key
Configuring your API key
The MCP server looks for your API key in the API_KEY environment variable.
You can set this in your shell or MCP configuration in the application (we'll cover a few examples below).
API_KEY=your-api-key-here
Claude Desktop configuration
Claude Desktop is popular tool for testing out workflows, testing, and debugging your prompts. It's like the hosted Claude.ai service, but comes packaged in an app that runs on your computer. Unlike Claude.ai, Claude Desktop can use MCP servers.
Here's a quick guide to setting up the MCP server in the Claude Desktop:
- Open the settings window in Claude Desktop.
- Click on the "Developer" settings tab.
- Click "Edit Config."
- Add the MCP server in the
mcpServersconfiguration section. - Save and restart Claude Desktop.
Here's an example configuration.
You'll need to know the path to the nodejs program,
and the (full!) path to index.js in the build folder.
{
  "mcpServers": {
    "stadiamaps": {
      "command": "/path/to/node",
      "args": ["/path/to/stadiamaps-mcp-server-ts/build/index.js"],
      "env": {
        "API_KEY": "YOUR-API-KEY"
      }
    }
  }
}
Anthropic docs
Claude Desktop is under active development, and the exact workflow steps may change over time. Refer to the Anthropic documentation for the latest instructions on integrating MCPs with Claude Desktop.
Warp configuration
Warp is similar to Claude Desktop, but it adds a significant number of capabilities, including the ability to execute commands in a terminal session and write files directly. Claude Desktop lets you upload a file into the chat context, but Warp gains the ability to execute code, use tools you may have already available on your computer, and write the results out to file directly.
Some example use cases:
- Batch geocoding a spreadsheet
- Filtering a dataset geographically
To set up an MCP in Warp, follow these steps:
- Open the Settings panel
- Select the AI tab and click "Manage MCP Servers"
- Fill out the missing pieces in the JSON template
The JSON format is almost identical to Claude Desktop. As before, you'll need the full path to the nodejs executable, and the built MCP server:
{
  "stadiamaps": {
    "command": "/path/to/node",
    "args": [
      "/path/to/stadiamaps-mcp-server-ts/build/index.js"
    ],
    "env": {
      "API_KEY": "YOUR-API-KEY"
    },
    "working_directory": null,
    "start_on_launch": true
  }
}
Programmatic Integration with TypeScript
You can also use our MCP directly with LLM APIs from Anthropic, OpenAI, and more! In fact, we expect this to be the most common production architecture. This lets you create applications combining the model's generalist abilities with the spatial intelligence of the Stadia Maps API.
We'll use the Anthropic API for our example code.
Set up an MCP transport and client
First, you'll need to set up an MCP client. This requires setting up a "transport." We're running locally with node via a separate process.
this.mcpTransport = new StdioClientTransport({
  command: "node",
  args: ["../build/index.js"],
  env: { ...process.env, API_KEY: process.env.STADIA_MAPS_API_KEY! },
});

this.mcpClient = new Client(
  { name: "stadiamaps-client", version: "1.0.0" },
  { capabilities: { tools: {} } },
);

await this.mcpClient.connect(this.mcpTransport);
console.log("🗺️  Connected to Stadia Maps MCP server");
Listing and using tools
We created the MCP client without any tools. We can load them at any time before use like so.
// Get tools dynamically from the MCP server
const { tools } = await this.mcpClient.listTools();
Why the dance back and forth?
MCP supports tool listing as a fundamental operation, because tools might not necessarily be static (for example, for a server accessed over HTTP using OAuth, it may change capabilities for authenticated users). Our server is currently static, but now you know what this is all about!
Then, we need to do a minimal transformation to get them into the right format for the Anthropic SDK. We'll also filter to a subset of the tools to save on context tokens. Tool calls can be quite expensive, since the LLM needs to add a lot of information to its context, so we recommend only enabling the specific tools you need when possible.
(This is the same as toggling tools on and off in Claude Desktop.)
const anthropicTools = tools.filter(({ name }) => {
  // Limit which tools are exposed to save context tokens!!
  return name === "time-and-zone-info" || name === "geocode" || name === "route-overview" || name == "static-map";
}).map(
  ({ name, description, inputSchema }) => ({
    // Convert to Anthropic format (minimal transformation)
    name,
    description,
    input_schema: inputSchema,
  }),
);
A conversation with tool calls
Here's what a typical conversation with tool calls looks like.
let messages: MessageParam[] = [{ role: "user", content: question }];
// Handle conversation with tool calls
while (true) {
  const response = await this.anthropic.messages.create({
    model: "claude-sonnet-4-0",
    max_tokens: 2048,
    messages,
    tools: anthropicTools,
  });

  // Add assistant response to conversation
  messages.push({ role: "assistant", content: response.content });

  // Check if Claude wants to use tools
  const toolCalls = response.content.filter(
    (c): c is ToolUseBlock => c.type === "tool_use",
  );
  if (toolCalls.length === 0) {
    return response; // No tools needed, we're done
  }

  // Execute all tool calls
  const toolResults = await Promise.all(
    toolCalls.map(async (toolCall) => {
      try {
        console.log(
          `Calling tool '${toolCall.name}' with input:`,
          toolCall.input,
        );
        const result = await this.mcpClient.callTool({
          name: toolCall.name,
          arguments: toolCall.input as Record<string, unknown>,
        });

        // Use structured content if available
        const content = (result as any).structuredContent
          ? JSON.stringify((result as any).structuredContent)
          // Process your tool call result; we've omitted this for brevity, since text is easy;
          // Refer to the full example for how to handle images or other content.
          : processToolResultContent(result.content);

        return {
          tool_use_id: toolCall.id,
          type: "tool_result" as const,
          content: content,
        };
      } catch (error) {
        return {
          tool_use_id: toolCall.id,
          type: "tool_result" as const,
          content: `Error: ${error instanceof Error ? error.message : String(error)}`,
          is_error: true,
        };
      }
    }),
  );

  // Add tool results to the conversation (and then loop around to get the response)
  messages.push({ role: "user", content: toolResults });
}
Points to note:
- Every message is adding to the list of messages throughout the conversation. Mind the context window (and be sure to investigate prompt caching techniques if needed)!
- The loop handles any tool calls as needed (a single prompt may result in multiple follow-up tool calls).
- You need to explicitly handle tool call requests. Your application code is in charge of executing or denying them.
And that's it for the basics of tool calling in your application code! We've put everything together in a full example on GitHub. Check it out!
Source Code
Our MCP Server is completely open source! You can find the code on GitHub.